Introduction
The Power Menu Icon is a dedicated control that can be used to control the power supplied to the breadboarding section of your UNDA.Xplora Kit.
The breadboarding section includes the breadboarding pinouts, breadboarding microcontroller and the breadboard.
Kit Vs. Breadboarding Power
The breadboarding power and kit's power are very different i.e:
- Kit's Power - This is the main power of the entire kit including powering the breadboarding section power and can be controlled by either connecting or disconnecting the kit from its power source.
- Breadboarding Power - The kit has been designed in such a way that the power sent to the breadboarding section can be controlled via the power menu icon. This allows the user to turn breadboarding power ON, OFF or reset it without needing to turn off the entire kit.
Opening the Power Menu
In the sections below, we will explore the design and features of the Power Menu Window.
Before that, use the steps below to open the Power Menu Window from the Main Menu:
Use the navigation buttons to move through the Main Menu Icons until you get to the Power Menu Icon.
Once the Power Menu Icon is highlighted, press the Center Navigation Button to open the Power Menu Window.
Power Menu Window
The Power Window Menu is made up of the following:
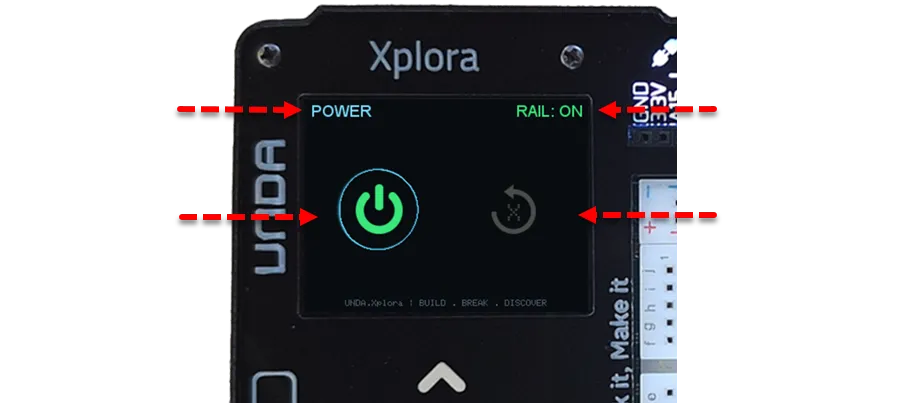
It displays the name of the selected icon option on the Power Menu Window.
Indicates whether power is currently being supplied (ON) or not supplied (OFF) to the breadboarding power rails.
This is the icon where the user makes use of the center navigation button to toggle between turning the breadboarding power ON or OFF.
It restarts the breadboarding microcontroller and restores it to its initial state.
When navigation through this window, use the following navigation buttons:
Left/Right: Used to move between the two Icon options of the Power Menu Window.
Center : Used to select or activate either of the highlighted option, i.e turning breadboarding power ON/OFF or reset power.
Power Options
Now that we have covered the Project Menu Features, we will cover the three different options and what each of them does.
| Option | Usage | Observation |
|---|---|---|
RAIL:ON | Turns the breadboarding section power ON | The breadboarding pins backlight turn red, indicating that power is being supplied to the breadboarding section. |
RAIL:OFF | Turns the breadboarding section power OFF | The breadboarding pins backlight change to your selected theme color, indicating that power is no longer being supplied to the breadboarding section. |
RESET | Resets the breadboarding microcontroller | A sound/tone plays to indicate that the reset is complete. |
The effect of Reset depends on what is running on the microcontroller:
MicroPython script (uPy): If the user last uploaded a uPy script, reset clears the microcontroller's RAM and thus the user will need to upload the script again to run their circuit.
Firmware (unda.bin) file: If a bin file had been uploaded, the reset restarts the firmware, causing it to begin execution again from the start of the program.
Reset can only be performed when the Breadboarding Power (RAIL) is ON. If it is OFF, an error message will inform you to turn it ON before resetting.
Conclusion
The Power Menu provides simple controls for managing power to the breadboarding section such as turning the breadboarding power ON or OFF or reset the breadboarding controller when needed.
Understanding these options helps you safely control the breadboarding section and restart the controller when required.